Wednesday, September 19, 2012
Tuesday, August 21, 2012
Monday, August 20, 2012
Sunday, August 12, 2012
Smith & Wesson Model 10-4
Chalk up another one for the Coyote gunsmith.
This one was not easy, but with this video I avoided all the pitfalls. Thanks to this guy. Did this one for a friend
PART I PART II
This one was not easy, but with this video I avoided all the pitfalls. Thanks to this guy. Did this one for a friend
PART I PART II
Wednesday, July 18, 2012
Shooters Exposure to Lead - Be Safe
Lead
Exposure At the Shooting Range
Sources of lead during shooting include:
Sources of lead during shooting include:
The primer compound, which is made of about 50 percent lead-containing compounds
The effect of the hot propellant gases on the base of the lead bullet;
Friction of the bullet against the barrel wall;
Fragmentation of the bullet against the target and backstop.
After the bullet leaves the muzzle of a handgun, the lead-containing gases naturally stream forward, unless they are diverted by wind or ventilation-created air currents. In a handgun with a compensator, the lead-containing gases stream in the direction of the compensator vents as well as out the muzzle. In an automatic pistol, as the slide returns to eject the spent case, some lead-containing gases are directed back toward the shooter. Fragmentation of the bullet against the target and backstop results in significant lead dispersal.
TIPS TO PREVENT LEAD POISON:
·
Use
copper-covered bullets.
·
Do not shoot in a poorly ventilated indoor
range.
·
Do not clean up lead dust in an indoor range
without the use of a protective air filter.
·
Do not clean up the lead fragments against the
backstop without the use of a protective air filter.
·
Avoid shooting on days when the wind is
blowing toward you.
·
Consider limiting the time you shoot on a busy
range to minimize exposure to second hand lead.
·
Consider sending as few shooters as possible
to score or put up new targets in an indoor range since the air lead is highest
at the target. Share this risk.
·
Do not eat while shooting. After shooting, wash your hands thoroughly
before you eat.
·
Do not smoke while shooting. After shooting, wash your hands thoroughly
before you smoke.
·
Leave indoor ranges immediately after
shooting.
·
Change your shirt after shooting to avoid
exposure to the lead that accumulates on your clothes. Wash your clothes after a trip to the range.
·
Have your blood lead checked if you shoot on a
weekly basis, if you shoot or reload more than 500 rounds a month, or if you
develop any symptoms of lead poisoning.
·
Consider wearing a protective air filter if
your blood lead is elevated.
LEAD SOURCES:
Lead (chemical symbol:
Pb) Lead accumulates in the human body because it is one of the few ingredients
not eliminated via kidney, liver or other methods of waste removal functions,
thus causing damage to red blood cells. Tiny doses of lead, ingested through
respiration or digestion accumulate over a long period of time can get into the
blood.
Projectiles are made up of lead, copper, zinc and antimony. The common properties of a primer are: copper, zinc, lead antimony, barium, lead styphnate and tetazene. Unless the bullet is totally encased in a non-lead product (copper), elemental lead is shaved as it passes through the barrel and then dispersed into the air.
The greatest risk to shooters is the compound leads that are vaporized and formed by the burning powder. There are two sources of this dangerous gas. One is the burning powder sears the base of the lead projectile causing lead gases to be expelled with the powder residue. The next source is the vaporized lead and lead styphnate when the primer is discharged.
Well know is the fact that long term and/or short intense exposure to lead particles and dust can cause lead poisoning. The sport of shooting and reloading should be safe if you are keenly aware of toxic levels of lead.
Even the tiniest amount as small as 1/2 of 1/10 of one grain (.005), dissolved in your blood can produce adverse conditions.
SUGGESTED PREVENTIVE MEASURES:
- Blow your nose after shooting;
- Wash your hands for at least 30 seconds under running water and soap after any shooting or reloading activities;
- Wash hair before bed. Lead particles in the hair can transfer to the pillow and thus be ingested during sleep;
- Use lead free primers. (Copper plated is the best)
- Your physician should test you for lead levels as part of your regular check-up;
- Wear breathing masks for extended time on the range.
- Change your shooting clothes and footwear so as not to contaminate car, home or office;
Common sense is
the key. If lead is a toxin and part of your job involves being exposed to it,
then keeping the work space and your personal gear clean is critical to
avoiding the dangers.
SUGGESTED RANGE RULES AND PROCEDURES:
- Avoid exposure to lead by handling fired cases or shooting should wash their hands and face before eating, drinking or smoking;
- Place contaminated clothes in a plastic bag to transport home to your laundry facilities;
- Wash immediately and separately contaminated clothing.
- Use lead-free ammunition;
- Dry sweeping should never be practiced on the range floor;
- Anyone engaged in shooting activities on a extensive basis should wear breathing masks.
- Some companies specialize in lead reclamation even by "mining" lead from outdoor earth banks.
- Shooters should have a BLL (blood lead level) test every six months.
Lead poisoning is a serious problem for
frequent shooters of non- lead- free ammunition. Lead contamination of clothing that has been
exposed to lead can be a significant factor. Beware of contamination transfer to car,
house, and work environments.
BE
SAFE!
Tuesday, July 17, 2012
REPRINTED:
Tool list:
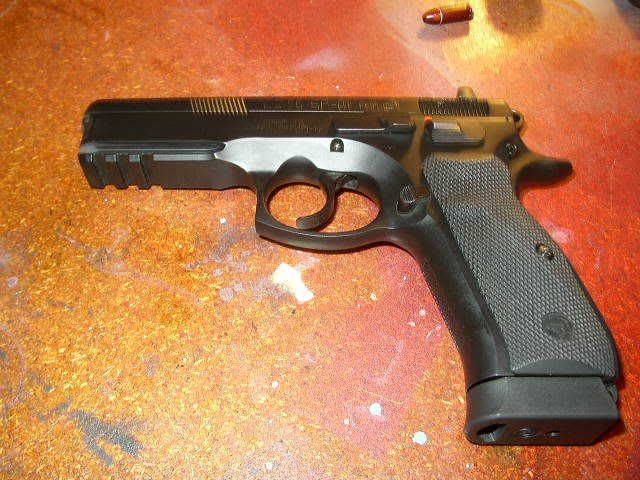
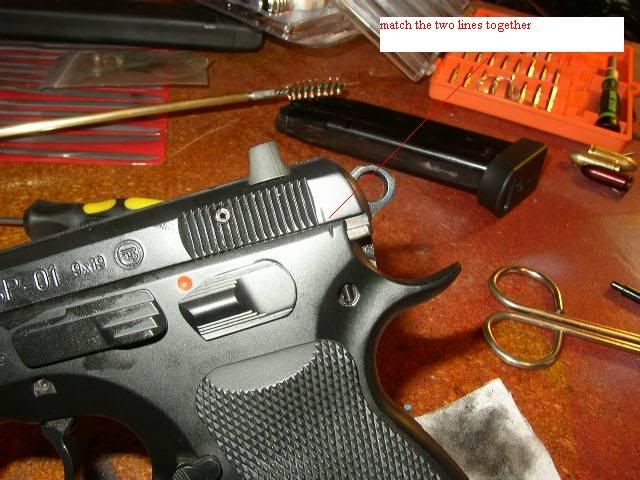
Remove the magazine, then align the two lines on the rear of the slide:
Push out the slide stop
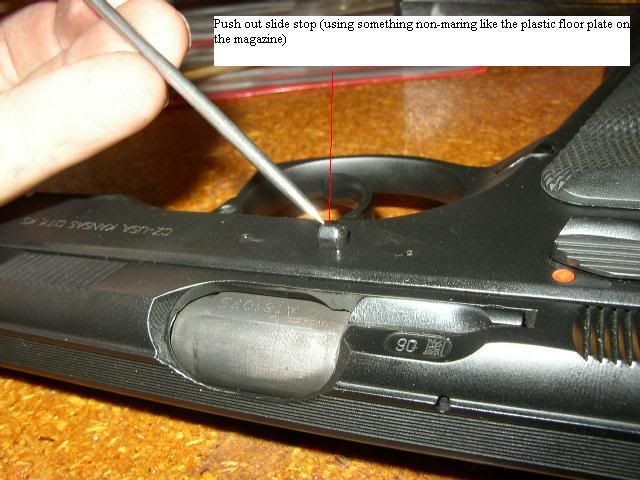
then pull it out
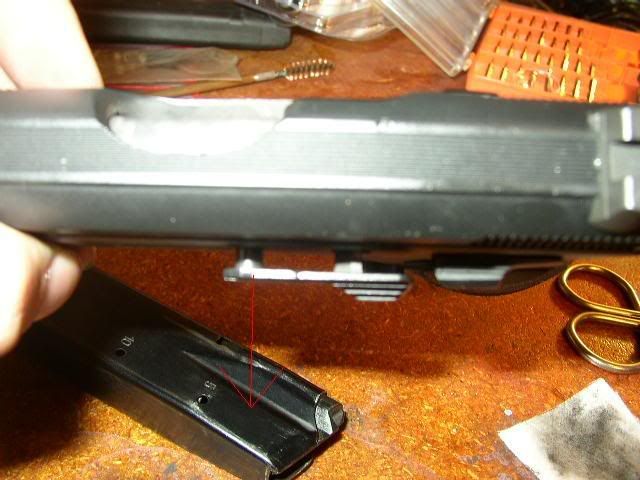
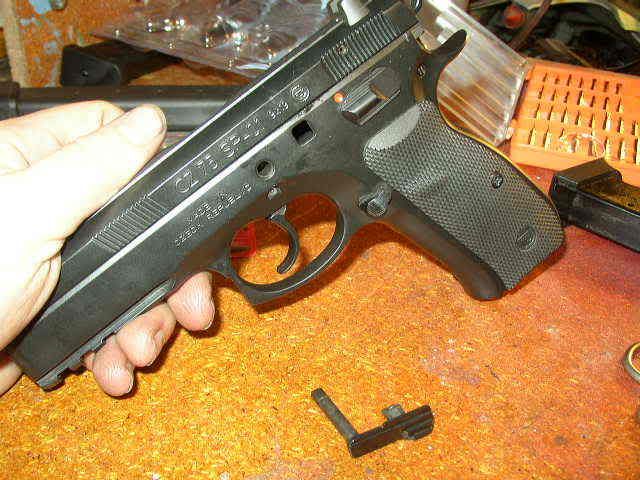
The slide will now pull off towards the front, removing the barrel and spring is not required for a trigger job
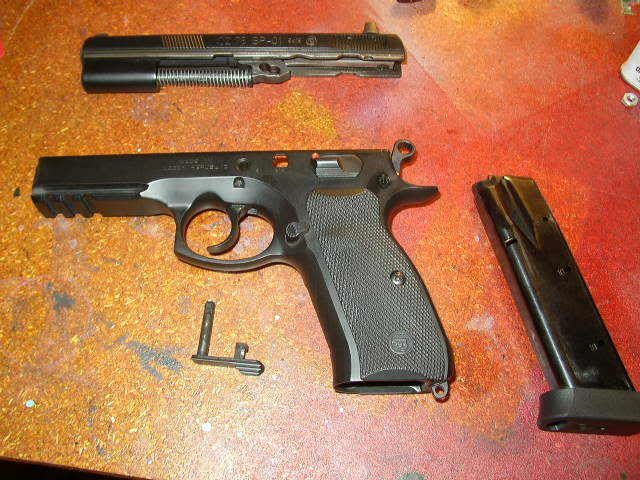
-----------------------------------------------------------------------------
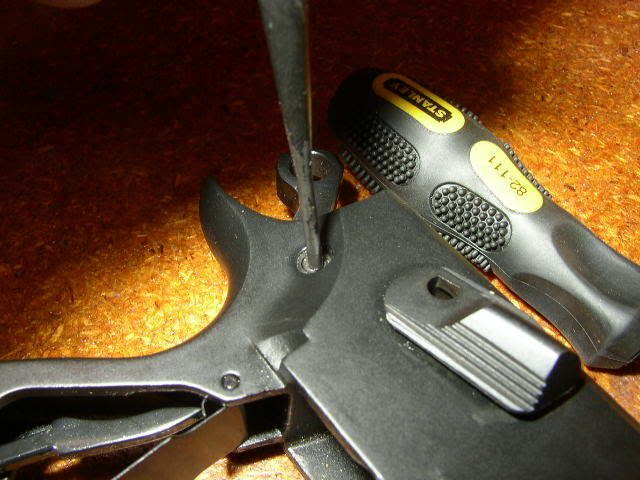
next remove the grips using a phillips screw driver
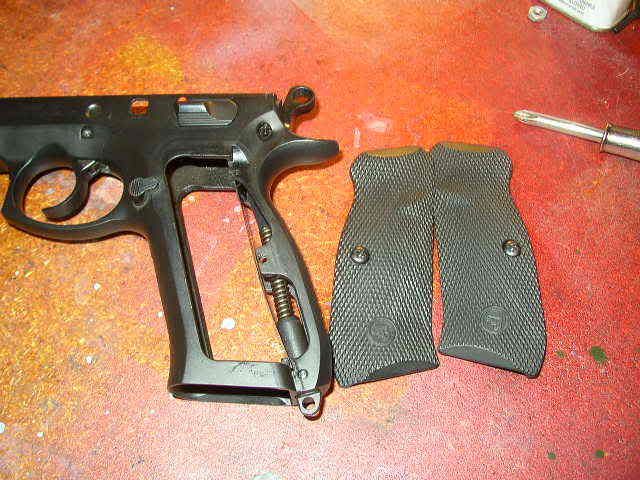
remove the mainspring plug pin (under pressure, push the plug against a table or similar surface while doing this)
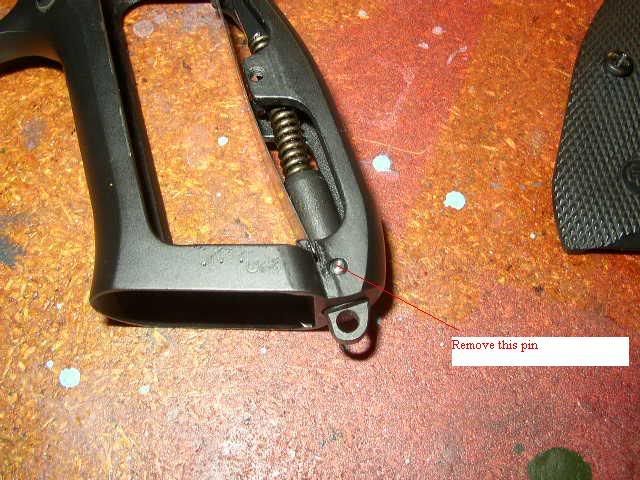
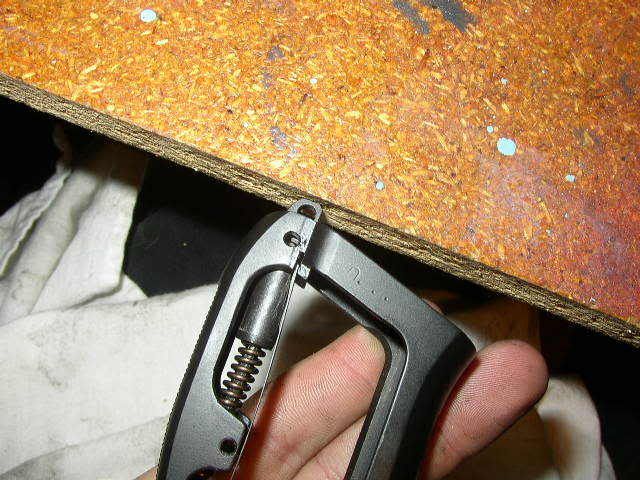
then carefully take out the magazine break like so lifting up and pulling forward:
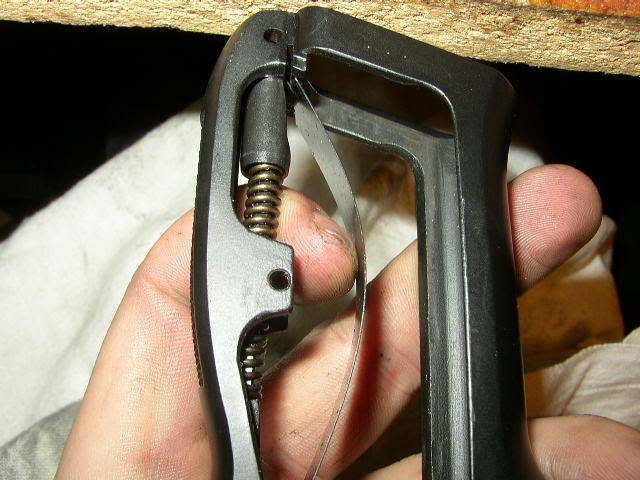
Then release the mainspring plug
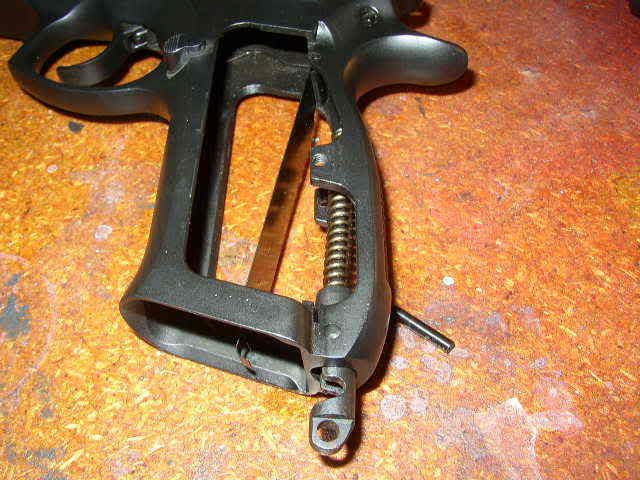
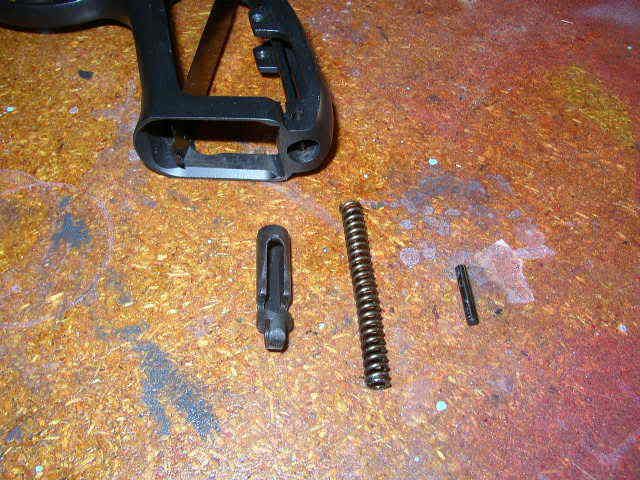
Pull out the plug and mainspring
----------------------------------------------------------------------------
Next lift up on the sear spring
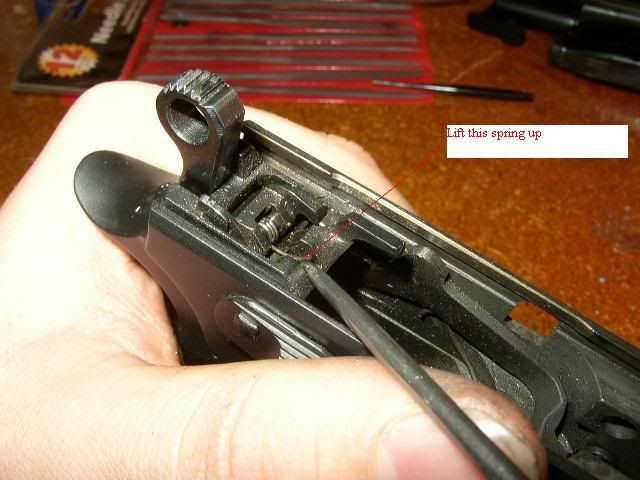
while lifting up the spring pull out the safety (helps if its on safe to give more to grab onto) The CZ-85B you have to pull out both sides of the safety
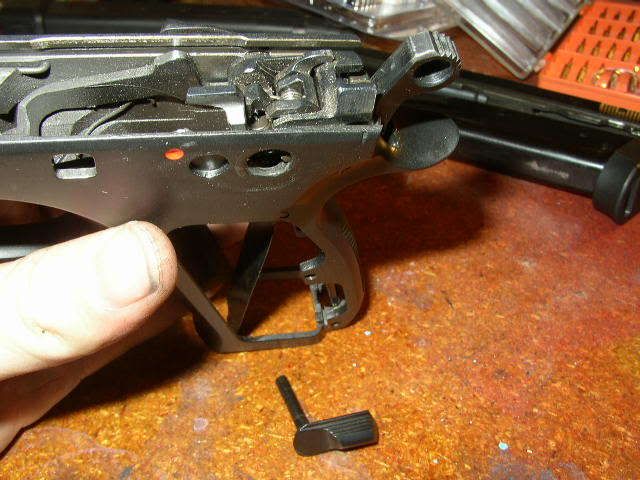
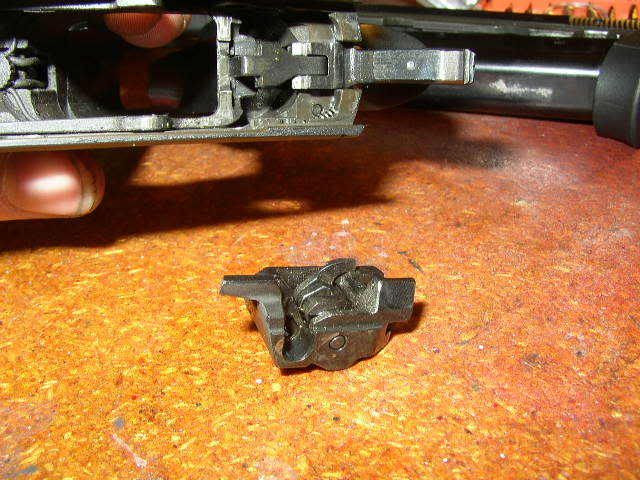
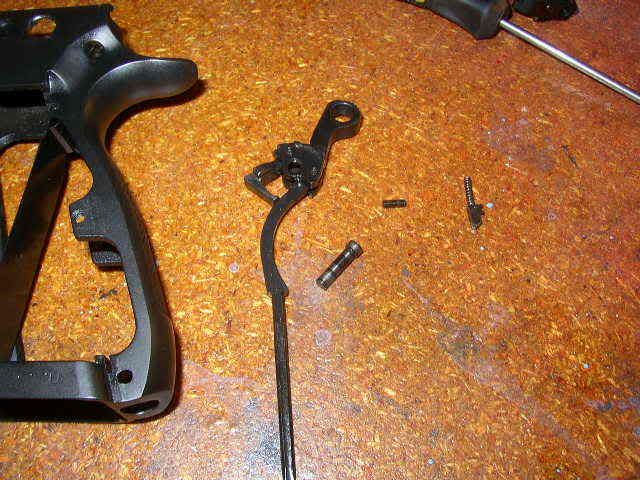
lift out the trigger assembly
Remove the sear pin
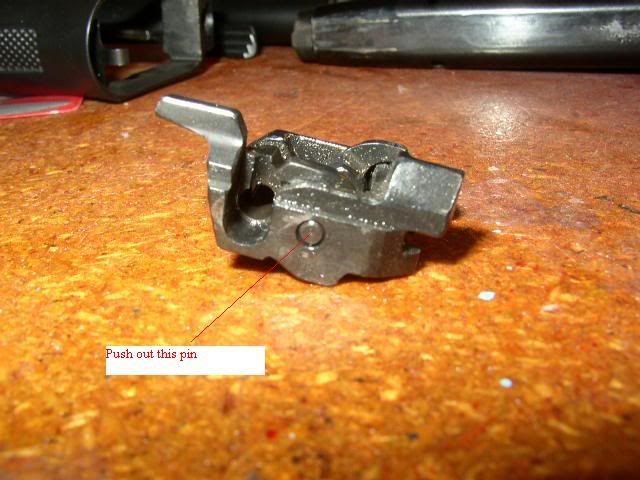
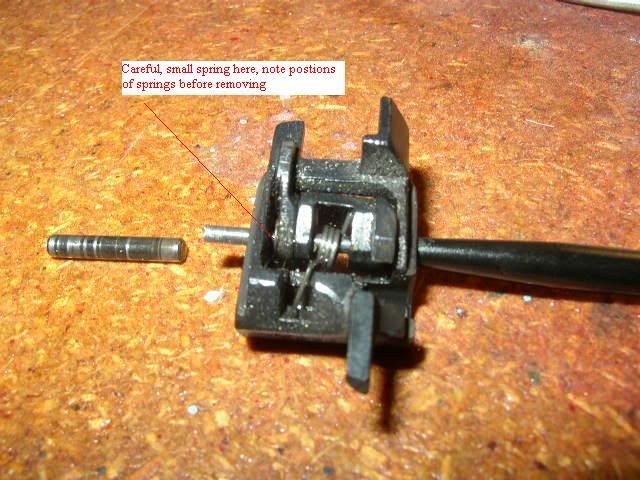
taken apart, be careful of the two small springs in it (sear spring and firing pin block lever spring)
------------------------------------------------------------------
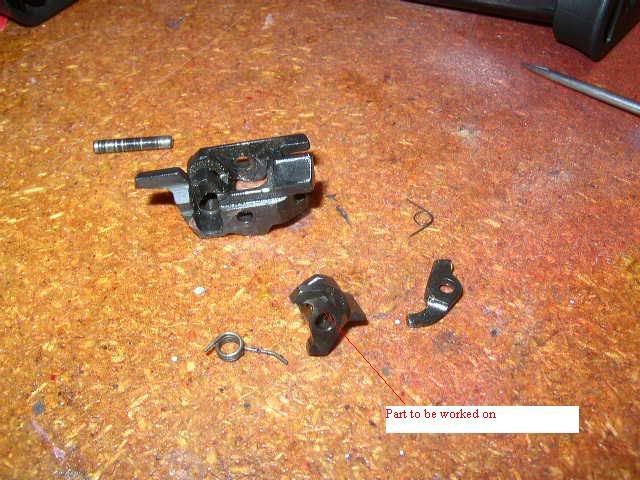
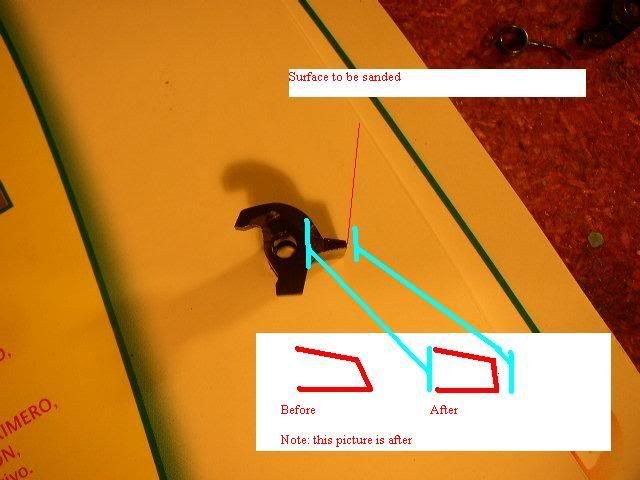
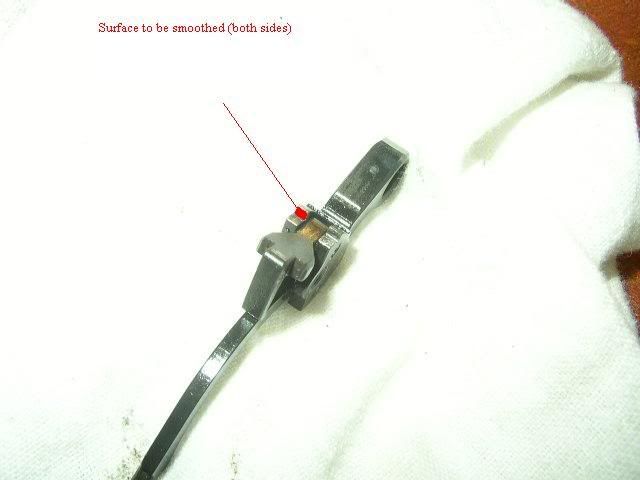
Next sanding on the sear. I use 400 grit paper and found it to be effective, while sanding I found putting the paper on a flat surface and carefully taking the sear across it the best way do sand it down, though other ways such as using a vise may also work. Also do not round any corners off!
The part to sand, this is after and it gives good trigger pull and weight. Do a little bit at a time to be safe, an note hammer engagement. When the trigger is pulled in single action, if the hammer moves back before releasing this is positive engagement (safest), if it doesn't move its neutral, and if it moves forward, negative (most unsafe). My goal is to have minimal postive engagement, though neutral may be desirable for a target oriented pistol)
Now reassembly of the trigger assembly (basically reverse order)
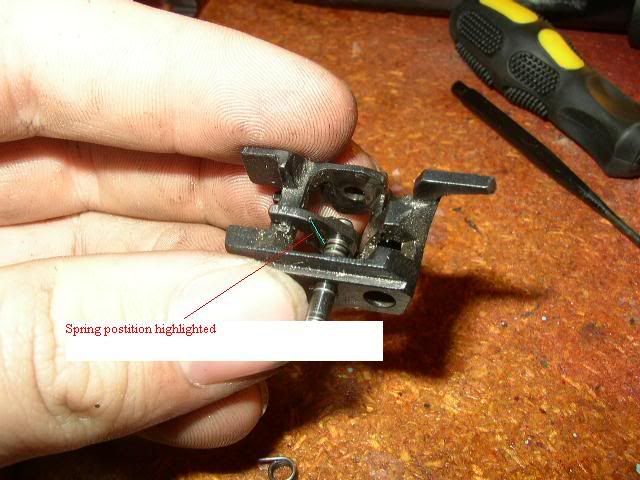
Leave firing pin safety lever spring like this for reassembly...
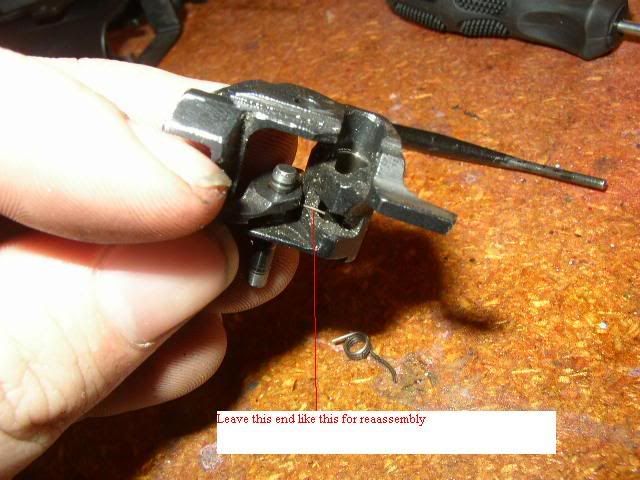
Then while carefully pushing lever towards its side move spring to its correct position
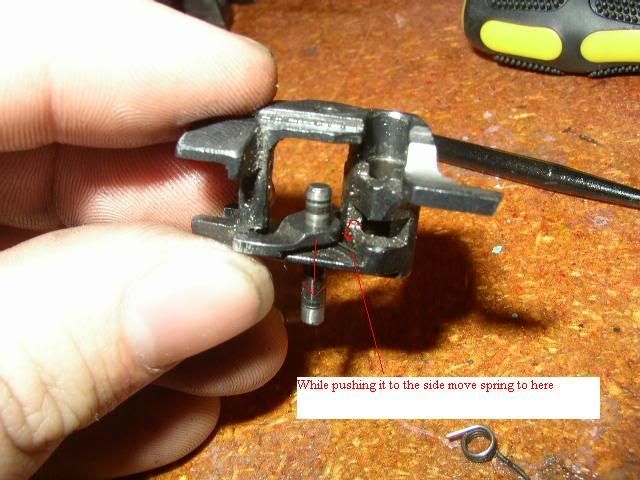
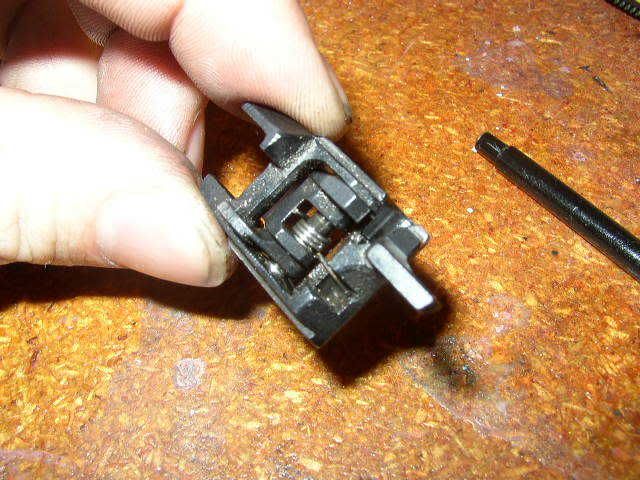
Reassembled
--------------------------------------------------------------------------------
Next is to get the hammer out
Push the safety detent plunger inward
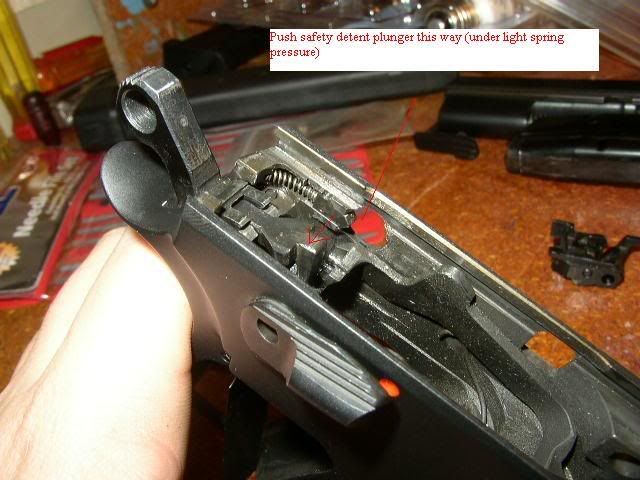
and remove

next is to remove hammer pin retaining peg
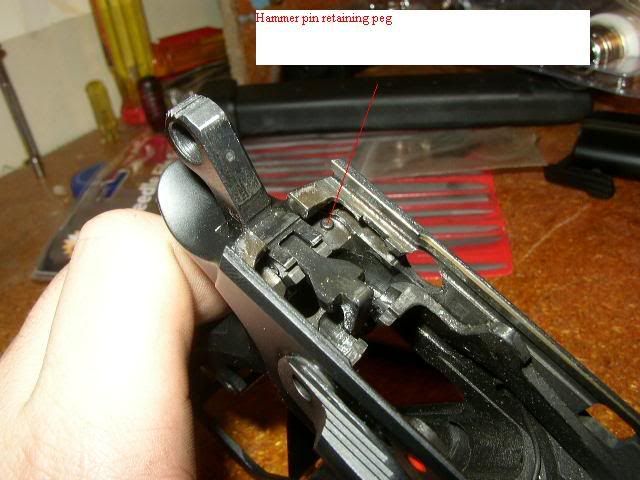
Push up on it from here
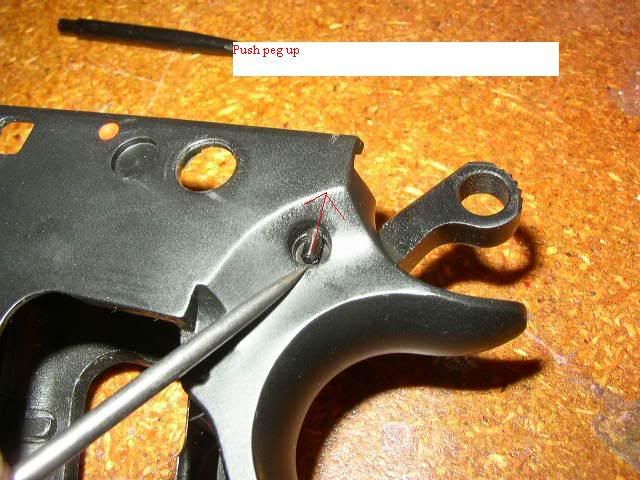
then pull out from the top using tweezers
Push out the hammer pin
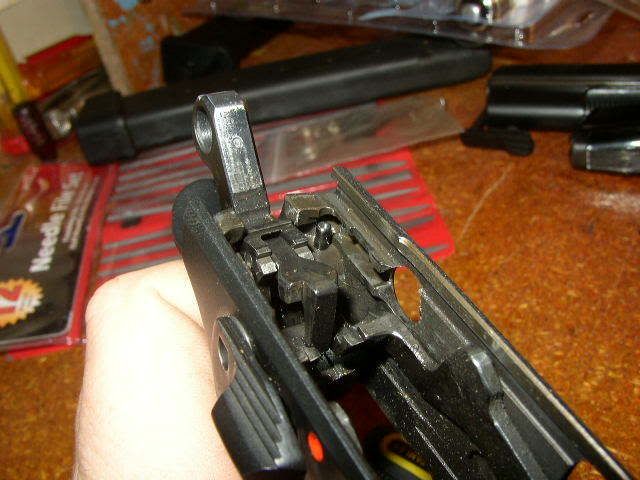
pull the hammer assembly out of the top
Shows the surfaces to be smoothed, also don't round any edges. I would recommend keeping the angles the same here too, can be angled backwards but I recommend against it, as it may cause negative engagement

----------------------------------------------------------------------------
Reassembly is just reversed, but with a few helpful tips
Lift this spring when putting safety back in
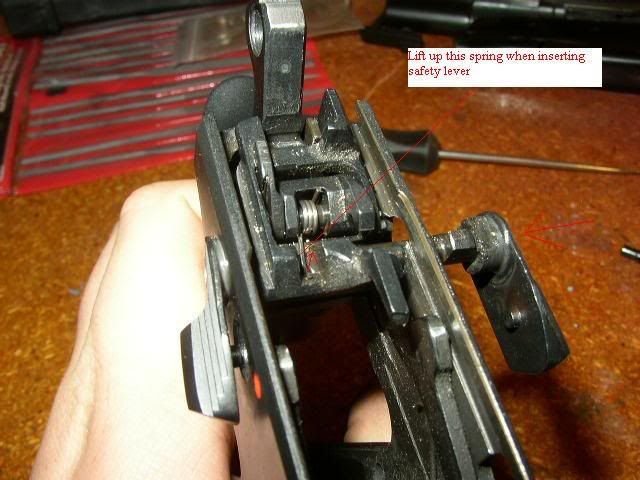
then push back the safety detent plunger back far as you can, while pushing safety back in.

Then reversed order on the main spring and grips and slide.
The mainspring also may be changed too as well to help with trigger pull, especially with double action. I used a Cz-52 spring since I have extras and found them to be reliable, you can get the same effect as cutting coils off, but that is un reversible and you may make it too light, you can get lighter springs here:
www.gunsprings.com/SemiAuto/EAANF.html
Then as usual function test the pistol and safety.
I hope this helps make your CZ trigger much better.
Tool list:
- picks (like dental picks)
- punch
- phillips screw driver
- sand paper (400 grit works well)
- paddedvise
Remove the magazine, then align the two lines on the rear of the slide:
Push out the slide stop
then pull it out
The slide will now pull off towards the front, removing the barrel and spring is not required for a trigger job
-----------------------------------------------------------------------------
next remove the grips using a phillips screw driver
remove the mainspring plug pin (under pressure, push the plug against a table or similar surface while doing this)
then carefully take out the magazine break like so lifting up and pulling forward:
Then release the mainspring plug
Pull out the plug and mainspring
----------------------------------------------------------------------------
Next lift up on the sear spring
while lifting up the spring pull out the safety (helps if its on safe to give more to grab onto) The CZ-85B you have to pull out both sides of the safety
lift out the trigger assembly
Remove the sear pin
taken apart, be careful of the two small springs in it (sear spring and firing pin block lever spring)
------------------------------------------------------------------
Next sanding on the sear. I use 400 grit paper and found it to be effective, while sanding I found putting the paper on a flat surface and carefully taking the sear across it the best way do sand it down, though other ways such as using a vise may also work. Also do not round any corners off!
The part to sand, this is after and it gives good trigger pull and weight. Do a little bit at a time to be safe, an note hammer engagement. When the trigger is pulled in single action, if the hammer moves back before releasing this is positive engagement (safest), if it doesn't move its neutral, and if it moves forward, negative (most unsafe). My goal is to have minimal postive engagement, though neutral may be desirable for a target oriented pistol)
Now reassembly of the trigger assembly (basically reverse order)
Leave firing pin safety lever spring like this for reassembly...
Then while carefully pushing lever towards its side move spring to its correct position
Reassembled
--------------------------------------------------------------------------------
Next is to get the hammer out
Push the safety detent plunger inward
and remove
next is to remove hammer pin retaining peg
Push up on it from here
then pull out from the top using tweezers
Push out the hammer pin
pull the hammer assembly out of the top
Shows the surfaces to be smoothed, also don't round any edges. I would recommend keeping the angles the same here too, can be angled backwards but I recommend against it, as it may cause negative engagement
----------------------------------------------------------------------------
Reassembly is just reversed, but with a few helpful tips
Lift this spring when putting safety back in
then push back the safety detent plunger back far as you can, while pushing safety back in.
Then reversed order on the main spring and grips and slide.
The mainspring also may be changed too as well to help with trigger pull, especially with double action. I used a Cz-52 spring since I have extras and found them to be reliable, you can get the same effect as cutting coils off, but that is un reversible and you may make it too light, you can get lighter springs here:
www.gunsprings.com/SemiAuto/EAANF.html
Then as usual function test the pistol and safety.
I hope this helps make your CZ trigger much better.
Thursday, June 28, 2012
Friday, June 22, 2012
Trigger Tuning
The following is an analysis of trigger travel and reset characteristics of
the CZ75 DA/SA. All of this is based on various sources. Amateur
gunsmith advice to successfully reduce the trigger travel and
reset on a SP01s; for competition . Elements that affect trigger travel and reset and reduce the reset on CZ75 DA/SA pistol. As always read and use it at your own
risk.
The main points of interest in the trigger pull/reset are illustrated in the following diagram.
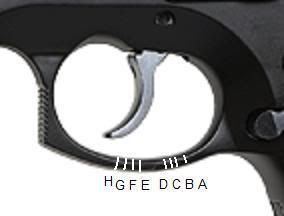
The marks (A, B, C, , H) represent the position of the tip of the trigger at various points in the trigger pull each point is described in the following table. Discussion lists values that represent a typical CZ75 DA/SA pistol.
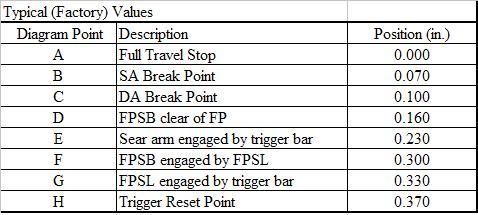
Each trigger position is marked in pencil on the trigger guard (similar to the above diagram). If extended, each mark would run from the tip of the trigger and cross the trigger guard perpendicularly at each labeled point. Using a caliper, distances are measured between the marks on the side of the trigger guard closest to the trigger. Values listed in the tables are given as distances measured from Point A.
To reduce reset, assess the actual travel between each of the above points and reduce unnecessary travel. CAUTION: Remember modifications in one area may affect others.
A-B Travel
Installing a trigger with an over-travel stop is the easiest way to reduce the trigger travel between points A and B. Alternatively one could delay the SA break point so that it is just 0.010 or so ahead of where the trigger contacts the frame at full travel.
B-C Gap
In order to function properly, the DA trigger must break slightly earlier in the pull stroke than the SA break point. The reason for this is that otherwise, when the SA sear releases the hammer, the DA disconnector would not be clear of the trigger bar and this would stop the hammer from falling. The typical value for this B-C gap is about 0.030 and this seems reasonable any more than this is probably a little excessive and might warrant reducing this gap (e.g. retard the DA break point by reducing the height of the leg on the disconnector). If this gap is less than 0.030 and the pistol functions properly and the SA trigger breaks cleanly (i.e. doesn't catch on the disconnector) then its probably fine as well. If this gap needs to be increased, one can consider delaying the SA break point be stoning material from the engagement face of the lower arm of the sear (this will close the A-B gap), or removing material from the bottom of the wings of the disconnector to advance the DA break point (this will close the C-D gap).
CD Gap
Before the hammer is released, the FPSB must be raised clear of the FP so that the hammer strike will launch the FP into the primer. Therefore, there must be some positive C-D gap. However, the 0.060 of gap in the typical set up illustrated can be trimmed considerably and reduce trigger travel and reset. This can be done by carefully stoning material from the engagement face of the lower arm of the FPSL. This must be done carefully, a little at a time, and checked frequently because if too much material is removed, the FPSB will not be released early enough and the gun may not fire. In this case, one must start with a new FPSL or reduce the height of the notch in the FP in which the FPSB sits (essentially reducing the engagement of the FPSB and FP).
This adjustment requires patience whereby you make small adjustments and checks the resulting C-D gap, frequently. Further, determining exactly where in the trigger pull the FPSB actually releases the FP is a little tricky you must cock the hammer and slowly and carefully pull the trigger while pushing on the (exposed) end of the FP with a small wooden stick (like a bamboo skewer). When the FPSB is clear of the FP, the FP will budge about and 1/8 or so. Note the position of the trigger at this point. Finally, to test that the FPSB really clears the FP in time, point the unloaded pistol at the ceiling, drop a pencil with a new eraser tip into the barrel (eraser end first) and pull the trigger. The pencil should fly at least a few inches indicating that it was struck by the FP (i.e. the FP was not blocked by the FPSB).
F-G Travel
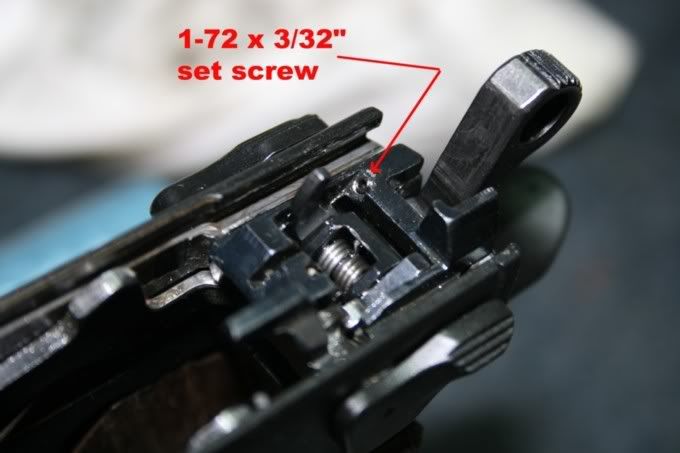
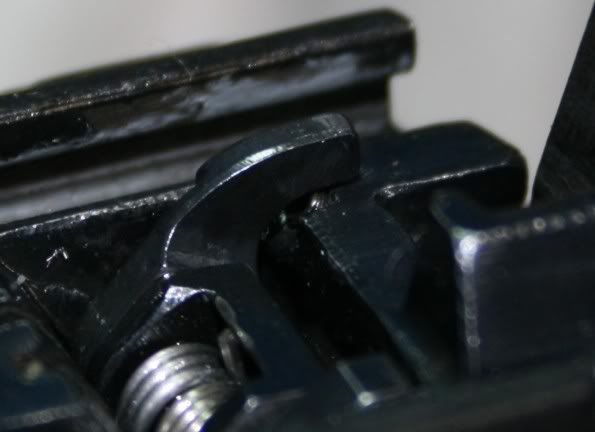
Ideally, when the slide is in battery, the top of the FPSL and the bottom of the FPSB should be in contact with each other so that as soon as the FPSL moves, the FPSB starts to rise. Conversely, any gap between these two parts when the slide is in battery leads to unnecessary trigger travel and reset. This can be remedied by installing a small set screw (or other suitable shim) in the ejector cage directly under the upper arm of the FPSL to shim this so it contacts the FPSB when the slide is in battery. The following photos show a 1-72 x 3/32 set screw serving this purpose. By carefully adjusting the set screw (shim height), the trigger travel/reset F-G can be reduced or eliminated.
G-H Travel
Ideally, the FPSL should be engaged as soon as the reset point is reached. In this case, the difference between these two points should be zero, instead of the 0.040 of slop in the typical stock value found above. The origin of this slop is in the geometry of the engagement faces of the trigger bar and lower leg of the FPSL. During the reset stroke, the trigger bar moves forwards to re-engage the lower FPSL arm. When the trigger bar clears the arm of the FPSL, it pops up and there will be a gap between the two if the engagement face geometry is angled shown in the following diagram. This leads to a crisp reset but the trigger travel G-H is required to close this gap (after reset) before the FPSL starts to move.
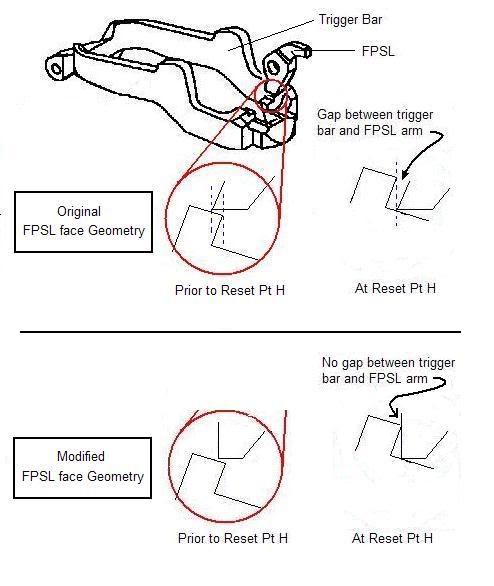
This gap can be eliminated/reduced by changing the angle of the face on the lower arm of the FPSL as shown in the lower part of the diagram. However, if the angle is changed too much, the crispness of the reset will be reduced or lost. By careful work, the travel G-H can be reduced/eliminated and still maintain a crisp reset. (NOTE: The above drawing is for illustration purposes only the angles of the faces are not necessarily representative of the actual faces. E.g. the modified face is shown perpendicular to the bottom edge of the FPSL arm and this is not necessarily the case.)
Optimal Reduced Reset Values
Based on the considerations outlined above, trigger travel/reset can be reduced (in the best case) to about 0.200. In this case, representative (reduced) trigger position at various points in the trigger pull (A, B, C, , H as above) are listed in the following table. In reality, one would be hard pressed to achieve all of the possible reset reduction outlined here and a reset in the neighborhood of 0.220" to 0.250" would be a more reasonable expectation in practice.
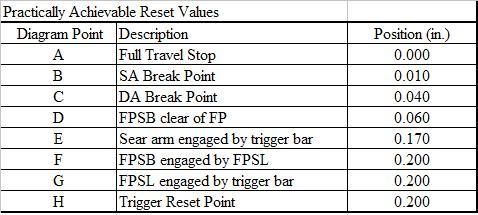
It should be noted that if not for the required engagement of the FPSB and FP, the shortest reset possible will be limited by the sear engagement point (0.170 in the above table based on typical factory sear/hammer engagement values). It is worth mentioning that removing the FPSB altogether (and modifying the FPSL to act as a spacer) should result in reducing the reset to this sear-limited value (and eliminates the need to address several of the more delicate issues discussed above). Further, reduction in sear/hammer engagement will further reduce the reset - using the CZ competition hammer and no FPSB, sub-0.100" reset is relatively easy to achieve and can approach half that amount with a little work. It should be noted, however, that very short reset such as this with relatively little sear-hammer engagement can lead to "doubling" whereby the movement of the gun in recoil can be enough to inadventently reset the trigger and break the next shot as the slide slams into battery.
Alternatively, one can shorten the reset to the limiting value of the factory sear/hammer engagement and still preserve most of the functionality of the FPSB by using the set screw discussed in "F-G Travel", above). In this case, the FPSL is raised (via the set screw) so that it partially raises the FPSB when the slide is in battery such that the lower arm of the FPSL lines up with the lower arm of the sear (and together they determine the (same) reset point). In the present (optimal) example, this will only reduce the engagement of the FPSB and the FP by about 20% ( = (0.200 0.170)/(0.200 0.060) = 0.030/0.140) and reduce reset to the sear engagement limited value.
In either case, it is assumed that the same considerations regarding the geometry of the engagement faces of the FPSL and trigger bar (addressed as above in G-H Travel) are applied to the engagement faces of the sear and trigger bar (i.e. one must address any "slop" introduced at the reset point as discussed in G-H Travel, above).
The main points of interest in the trigger pull/reset are illustrated in the following diagram.
The marks (A, B, C, , H) represent the position of the tip of the trigger at various points in the trigger pull each point is described in the following table. Discussion lists values that represent a typical CZ75 DA/SA pistol.
Each trigger position is marked in pencil on the trigger guard (similar to the above diagram). If extended, each mark would run from the tip of the trigger and cross the trigger guard perpendicularly at each labeled point. Using a caliper, distances are measured between the marks on the side of the trigger guard closest to the trigger. Values listed in the tables are given as distances measured from Point A.
To reduce reset, assess the actual travel between each of the above points and reduce unnecessary travel. CAUTION: Remember modifications in one area may affect others.
A-B Travel
Installing a trigger with an over-travel stop is the easiest way to reduce the trigger travel between points A and B. Alternatively one could delay the SA break point so that it is just 0.010 or so ahead of where the trigger contacts the frame at full travel.
B-C Gap
In order to function properly, the DA trigger must break slightly earlier in the pull stroke than the SA break point. The reason for this is that otherwise, when the SA sear releases the hammer, the DA disconnector would not be clear of the trigger bar and this would stop the hammer from falling. The typical value for this B-C gap is about 0.030 and this seems reasonable any more than this is probably a little excessive and might warrant reducing this gap (e.g. retard the DA break point by reducing the height of the leg on the disconnector). If this gap is less than 0.030 and the pistol functions properly and the SA trigger breaks cleanly (i.e. doesn't catch on the disconnector) then its probably fine as well. If this gap needs to be increased, one can consider delaying the SA break point be stoning material from the engagement face of the lower arm of the sear (this will close the A-B gap), or removing material from the bottom of the wings of the disconnector to advance the DA break point (this will close the C-D gap).
CD Gap
Before the hammer is released, the FPSB must be raised clear of the FP so that the hammer strike will launch the FP into the primer. Therefore, there must be some positive C-D gap. However, the 0.060 of gap in the typical set up illustrated can be trimmed considerably and reduce trigger travel and reset. This can be done by carefully stoning material from the engagement face of the lower arm of the FPSL. This must be done carefully, a little at a time, and checked frequently because if too much material is removed, the FPSB will not be released early enough and the gun may not fire. In this case, one must start with a new FPSL or reduce the height of the notch in the FP in which the FPSB sits (essentially reducing the engagement of the FPSB and FP).
This adjustment requires patience whereby you make small adjustments and checks the resulting C-D gap, frequently. Further, determining exactly where in the trigger pull the FPSB actually releases the FP is a little tricky you must cock the hammer and slowly and carefully pull the trigger while pushing on the (exposed) end of the FP with a small wooden stick (like a bamboo skewer). When the FPSB is clear of the FP, the FP will budge about and 1/8 or so. Note the position of the trigger at this point. Finally, to test that the FPSB really clears the FP in time, point the unloaded pistol at the ceiling, drop a pencil with a new eraser tip into the barrel (eraser end first) and pull the trigger. The pencil should fly at least a few inches indicating that it was struck by the FP (i.e. the FP was not blocked by the FPSB).
F-G Travel
Ideally, when the slide is in battery, the top of the FPSL and the bottom of the FPSB should be in contact with each other so that as soon as the FPSL moves, the FPSB starts to rise. Conversely, any gap between these two parts when the slide is in battery leads to unnecessary trigger travel and reset. This can be remedied by installing a small set screw (or other suitable shim) in the ejector cage directly under the upper arm of the FPSL to shim this so it contacts the FPSB when the slide is in battery. The following photos show a 1-72 x 3/32 set screw serving this purpose. By carefully adjusting the set screw (shim height), the trigger travel/reset F-G can be reduced or eliminated.
G-H Travel
Ideally, the FPSL should be engaged as soon as the reset point is reached. In this case, the difference between these two points should be zero, instead of the 0.040 of slop in the typical stock value found above. The origin of this slop is in the geometry of the engagement faces of the trigger bar and lower leg of the FPSL. During the reset stroke, the trigger bar moves forwards to re-engage the lower FPSL arm. When the trigger bar clears the arm of the FPSL, it pops up and there will be a gap between the two if the engagement face geometry is angled shown in the following diagram. This leads to a crisp reset but the trigger travel G-H is required to close this gap (after reset) before the FPSL starts to move.
This gap can be eliminated/reduced by changing the angle of the face on the lower arm of the FPSL as shown in the lower part of the diagram. However, if the angle is changed too much, the crispness of the reset will be reduced or lost. By careful work, the travel G-H can be reduced/eliminated and still maintain a crisp reset. (NOTE: The above drawing is for illustration purposes only the angles of the faces are not necessarily representative of the actual faces. E.g. the modified face is shown perpendicular to the bottom edge of the FPSL arm and this is not necessarily the case.)
Optimal Reduced Reset Values
Based on the considerations outlined above, trigger travel/reset can be reduced (in the best case) to about 0.200. In this case, representative (reduced) trigger position at various points in the trigger pull (A, B, C, , H as above) are listed in the following table. In reality, one would be hard pressed to achieve all of the possible reset reduction outlined here and a reset in the neighborhood of 0.220" to 0.250" would be a more reasonable expectation in practice.
It should be noted that if not for the required engagement of the FPSB and FP, the shortest reset possible will be limited by the sear engagement point (0.170 in the above table based on typical factory sear/hammer engagement values). It is worth mentioning that removing the FPSB altogether (and modifying the FPSL to act as a spacer) should result in reducing the reset to this sear-limited value (and eliminates the need to address several of the more delicate issues discussed above). Further, reduction in sear/hammer engagement will further reduce the reset - using the CZ competition hammer and no FPSB, sub-0.100" reset is relatively easy to achieve and can approach half that amount with a little work. It should be noted, however, that very short reset such as this with relatively little sear-hammer engagement can lead to "doubling" whereby the movement of the gun in recoil can be enough to inadventently reset the trigger and break the next shot as the slide slams into battery.
Alternatively, one can shorten the reset to the limiting value of the factory sear/hammer engagement and still preserve most of the functionality of the FPSB by using the set screw discussed in "F-G Travel", above). In this case, the FPSL is raised (via the set screw) so that it partially raises the FPSB when the slide is in battery such that the lower arm of the FPSL lines up with the lower arm of the sear (and together they determine the (same) reset point). In the present (optimal) example, this will only reduce the engagement of the FPSB and the FP by about 20% ( = (0.200 0.170)/(0.200 0.060) = 0.030/0.140) and reduce reset to the sear engagement limited value.
In either case, it is assumed that the same considerations regarding the geometry of the engagement faces of the FPSL and trigger bar (addressed as above in G-H Travel) are applied to the engagement faces of the sear and trigger bar (i.e. one must address any "slop" introduced at the reset point as discussed in G-H Travel, above).
Monday, June 18, 2012
Wednesday, June 6, 2012
IDPA
Shoot my first IDPA match last night. Certainly different, I need to become more familiar with the rules. Same old story, I am not first but I am not last. This is great practice for holster draw and fire for USPSA, especially during the cooler winter months.
I look forward to going back and making adjustments.
Practice
I like this technique, you can she is pushing the gun and anticipating the recoil in this exercise, which I believe I am guilty of also.
Monday, May 28, 2012


Subscribe to:
Posts (Atom)
